~ How To Projects ~
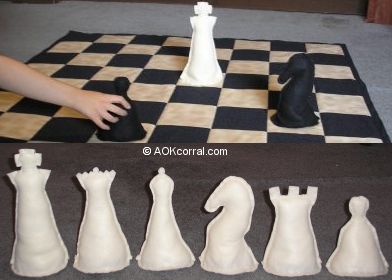
Large Chess Board & Pieces

Click below for more
Craft Projects and Patterns
|
~ Projects By Theme ~
- Animals
- Seasonal
- Holidays
|
|
Large Chess Board & Pieces (Part 2 - Pieces)
~
August 2006
|
- Black Felt
- Off White Felt
- Black Embroidery Floss
- Off White Embroidery Floss
- Needle
- Pins
- Pencil
- Sharp Scissors
- Polyfil
- Pinto Beans
- Patterns for Chess Pieces (links to patterns below)
- Graph Paper with 4 squares per inch grid.
|
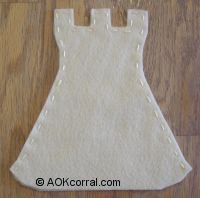
- Cut out 2 Rook pieces.
- Thread your needle with embroidery floss in the same color as your chess piece.
- Take both pieces of your Rook and line up the edges. Pin together in a few places to hold in place while handsewing.
- Starting from one bottom corner, join the pieces together with a running stitch that is 1/8 to 1/4 inch from the edge and with stitches that are about 1/4 inch apart.
- Stitch all the way around the chess piece but leaving the bottom open.
- Stuff the chess piece with Polyfil being careful to stuff smaller corners and the neck well for added strength and stiffness during play.
- Turn the Rook so that the bottom is facing you and open it out, then place the round base piece over the bottom. Next, you will stitch the base onto the bottom of the Rook so that the base is completely flat at the bottom.
- Get your needle threaded and ready again and line up the base edge against the bottom edge wherever you want to begin stitching.
- Sew a running stitch about 1/8 to 1/4 inch from the edge and around the base of the chess piece until there is only 1-2 inches open.
- Add any additional Polyfil needed to finish filling the chess piece but do not stuff the last 1/4 inch so you leave a little bit of area for the beans.
- Measure out 1/2 cup of pinto beans and pour into a small zip lock bag. Push out the extra air and fold the edges of the bag in so that the beans are in approx. a 3 x 3 inch area of the bag.
- Slip the bag of beans into the very bottom of the chess piece.
- Finish sewing your running stitch over the last 1-2 inch opening to close.
- Follow these steps for each of the chess pieces to complete the set.
|
|
|


