~ How To Projects ~
How to Sew Binding on a Quilt
Use this tutorial to learn how to bind a quilt with a sewing machine.

Click below for more
Craft Projects and Patterns
|
~ Projects By Theme ~
- Animals
- Seasonal
- Holidays
Get this entire project
WITHOUT
Ads, Banners, Logo or Margins
Purchase the Ad Free / Easy Print PDF Version for only $1.95

|
|
How to Bind a Quilt
Go back to How to Make a Quilt / Comforter Main Project Page
© Copyright 2012 by AOK Corral Craft and Gift Bazaar All rights reserved.
These projects are for your personal use only and may not be reprinted or copied.
You may print this page as is or... See our easy print option below.
|
|
|
Binding on a quilt or comforter project is usually done as one long strip, stitched around the entire project. Obviously, it would be crazy to buy yards and yards of fabric to go around an entire bed quilt or comforter out of one cut. Instead, we will cut strips of fabric and join them together with the sewing machine.
Follow the recommendations of the project you are making for the right width and length to cut the strips. (Often 2" wide for low loft batting and thin fabrics to 3" wide for higher loft or thicker fabrics.) Be sure to cut your strips along the lengthwise grain of fabric to help keep them from stretching out of shape while sewing.
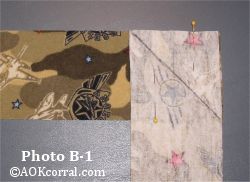
- Take two strips and place their ends right sides together, but at 90 degree angles to each other. Pin in place. Note that the overlapped fabric ends will form a square. (Photo B-1)
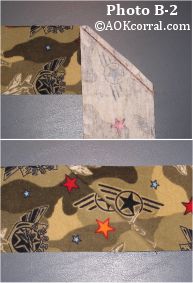
- Using a ruler and a marking pen, draw a line across the square so that the corner pointing away from the fabric strips is the tip of a triangle.
- Stitch the binding strips together along the line and trim off the triangle corner ¼ inch from your stitching line. (Photo B-2)
- Fold open the fabric strips so both right sides face up and press seam.
- Continue in these steps until all strips are joined together.
- On one end of your binding strip, fold ¼ in to the wrong side and press. This end will be the start of the binding strip.
- Next, fold the binding in half, with wrong sides together, along the whole length of the strip and press with your iron.

You should do this on a large table so the quilt can rest on the table to your left while you are sewing.
- Turn your quilt so that the back side is facing up, then find the center of the bottom edge of the quilt. You will start your binding here.
- Start with the ¼ folded end of your binding strip. Lay the strip along the edge of the quilt matching up raw edges of both the quilt and the strip.
- Stitch until you reach about ½ from the first corner.
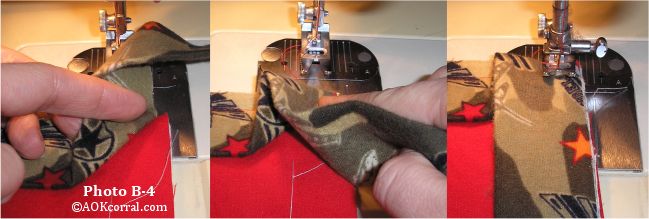
- Here you will create what is called a mitered corner which is basically a corner that looks like a frame corner. To start the corner, lift your needle out of the fabric, raise your presser foot and pull your work out of the machine a bit, then rotate your quilt 90 degrees so that the next side to stitch is vertical in front of you. (Photo B-3)
- Now, fold the binding strip back so that the fold is at a 45 degree angle from raw edge that you are about to stitch down. (Photo B-4)
- While keeping the first fold at about 45 degrees, move the binding strip toward the edge of the quilt that you previously stitched onto until another fold is created that runs along the stitched edge. (You may have to adjust the 45 degree angle just a bit in order to get the second fold to line up to the stitched edge. That is ok.)
- Put this folded assembly back into the sewing machine at the start of the side you are about to stitch. Stitch through assembly and continue stitching binding to quilt along this edge.
- Repeat steps 3 through 7 for each corner.
- When you reach the bottom edge of the quilt again, keep stitch the binding until it overlaps the start of the strip by about 2 inches.
- From there, measure out another 2 inches on the binding strip and cut any extra length off.
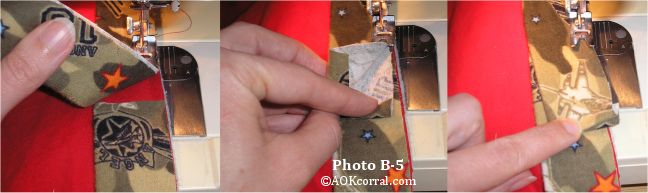
- At the end of the strip, open out the folded binding and fold in a hem of about ¼ . Fold the binding back up. (Photo B-5)
- Lay the binding end back onto the quilt to finish stitching it but let the raw edge extend out beyond the quilt edge just a bit. (This will help keep the end from sticking out when finished.)
- Flip your quilt over on your table so that you can sew on the right side. Bring your binding strip around the edge to the right side and enough that it covers the seam from the other side.
- Start stitching at the bottom of the quilt again but just beyond where you ended the binding. (If you wish, you can use a zig-zag stitch or other decorative stitch here for a nice look.)
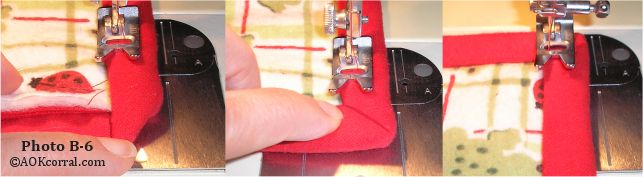
- When you reach a corner, stop about ½ from the end and lay the rest of the binding for this side down against the machine. The end will extend beyond the next side of the quilt and form a 45 degree angle from the corner of the quilt down and to the left. (Photo B-6)
- While holding this angle in place, pick up the binding for the next side and fold it over the quilt edge. This will create a frame like corner. Hold the corner in place and carefully stitch just enough for the needle to catch some of the binding for the next edge.
- Lift your presser foot, rotate the comforter 90 degrees, then put it back down and start to stitch down the next side of the quilt.
- Follow steps 15 to 17 for each corner and stitch along the bottom edge of the quilt until the overlapped binding at the end has been completely stitched down.
|
You may Print this page as it is ...OR...
Purchase the Easy Print Version for $1.95
The Easy Print Version includes ALL these instructions for how to bind a quilt, plus instructions for making a quilted comforter in crib, twin, full and queen sizes without margins, ads or logos.
|
|
|
Go back to How to Make a Quilt / Comforter Main Project Page
|
|
|


