~ How To Projects ~
Bunny Ornaments

Click below for more
Craft Projects and Patterns
|
~ Projects By Theme ~
- Animals
- Seasonal
- Holidays
|
|
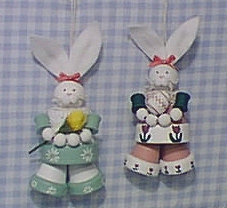
Terra Cotta Bunny Ornaments
~
May 2000
|
- Terra Cotta Flower Pots with holes in the bottom
- One pot that is 1-1/2" in height
- Two pots that are 1-1/4" in height
- Acrylic Craft Paint
- Paintbrush
- Toothpicks
- One 25mm Round Bead
- Two spools that are 1/2" x 1/2"
- Twine/String
- 3/4" Lace (approx. 4" piece for one bunny)
- Four 10mm Round Beads
- Small wooden eggs (Wren Egg) or Small Flowers
- Felt Pieces (White)
- Craft Wire
- Hot Glue Gun
- 1/8" Dowel
- Two White Pompoms that are 7mm in size
- 1/8" Ribbon (any color)
|
- Wash the terra cotta pots with mild soap. Let dry completely.
- Paint pots, spools, beads, and egg if using.
- Turn the large pot upside-down so that the narrow end or bottom of the pot is now the top.
- Glue the lace around the top, narrow, edge of the pot to form a lace collar.
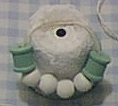
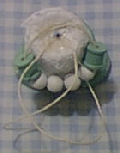
- Cut a piece of string approx. 5 inches long.
- Thread the string through one spool and then the four 10mm beads, then the other spool.
- Holding the ends of the string, position the spools and beads against the pot so that the top edges of the spools are just slightly below the top, narrow, edge of the pot.
- Hot glue the string into position on the top of the pot. (Be careful not to cover the hole)
- Trim off the excess string. (These steps are shown in the photo)
- Cut a piece of dowel that is about 1/4" long.
- Cut a piece of string that is approx. 4" long.
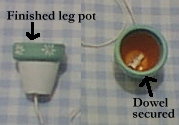
- Tie one end of the string around the piece of doweling.
- Inside one of the small pots, thread the other end of the string through the hole in the base. (Do not pull completely through to the doweling yet.)
- Add some hot glue to the base of the pot on the inside.
- Now pull the string completely through to hole, making sure that the doweling rests against the hot glue inside the base of the pot.
- Do the same to the other small pot.
- Paint the eyes, nose, and mouth onto the 25mm bead.
- Fray some string to make whiskers.
- Center the whiskers below the nose and glue them on.
- Take the two pompoms, press them together firmly and glue them over the whiskers.
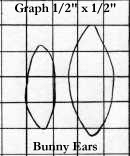
- Using the graph pattern provided, cut out felt pieces for the ears. (The graph is 1" x 1").

- Cut two pieces of craft wire that measure 2".
- Curl one tip of each piece of craft wire.
- Now, on the back of the larger ear piece, lay a strip of glue almost as long as the smaller ear piece.
- Place the wire in the glue with the curled tip at the top.
- Lay the smaller ear piece over the wire, covering the wire and glue.
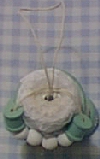
- Take the small pots (leg pieces) and the large pot (body piece), Thread the string from a leg up inside of the large pot, through the hole.
- Outside the pot, hold the end of the string toward you, laying the string against the top of the large pot.
- Adjust the string so that the base of the small pot is just out of sight, hidden under the edge of the large pot.
- Hot glue the string against the base of the large pot just outside of the hole. (See photo)
- Repeat with the other small pot, being careful to make the legs look even.
- After the glue has set, tie the two hanging pieces of string together, keeping them as flat as possible.
- Glue the tie down and trim the extra string off.
- (Practice setting the head bead on the body. If any of the string shows, cover it by gluing a small piece of lace over the area.)
- Cut a piece of string long enough to hang the ornament, approx. 7".
- Tie the ends together into a knot.
- Thread the looped end of the string through the inside of the large pot. (Make sure that the knot does not go through.)
- Hot glue the knot to the inside base of the large pot.
- Cut a piece of dowel that is about 2" long.
- Glue the head to the dowel by placing a strip of glue on the dowel and carefully guiding it into place. (Important Tip: The string hanger and the wood dowel both have to fit through the bead hole in the head. To make sure that they both fit through nicely, glue the dowel into the head against the front or against the back so that the string hanger can easily and evenly slide through the opposite side of the hole.)
- Thread the looped string hanger through the head and at the same time, guide the doweling through the hole in the body.
- Before pulling them completely together, hot glue around the hole on the large pot where the head will touch. Pull the head down tightly in place.
- Place a string of hot glue along the wire end of the ears and insert it into the head.
- Repeat with the other ear.
- Make a small bow with the ribbon and glue it to the base of the ears.
- Glue the egg or a flower to the body so that it is resting slightly on the beads (hands).
|
|
|


