~ How To Projects ~
Fall Candle Holder

Click below for more
Craft Projects and Patterns
|
~ Projects By Theme ~
- Animals
- Seasonal
- Holidays
|
|
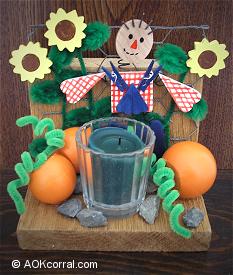
Fall Candle Holder
~
August 2005
|
- Flat Wood Shapes ( All shapes are approx. 1/8" to 1/4" thick.)
- One - 1 and 1/4" Square.
- Six - 1 and 1/2" high; Primitive Heart Shapes.
- Two - 1" high: Primitive Heart Shapes.
- Three - 1 and 1/4" Sunflower Shapes.
- One - 1 and 1/4" Oval
- Two - 1 and 1/2" diameter Wood Ball Knobs
- One - 1 and 3/4" diameter Wood Ball Knob.
- Small hole chicken wire cut to approximately 5 inches square after bending sharp edges. (Trim or bend ends of wire so there are no sharp edges sticking out.)
(If you cannot find the wood shapes above in your local craft stores you can purchase them Online Here)
- Two wood pieces that are at least 1/2 inch thick and measuring:
- 4 and 1/2 inch x 5 1/2 inch (back)
- 3 and 1/2 inch x 5 1/2 inch (base)
- Two - 1" Tiny Spring Clothes Pins
- Two nails and a hammer
- Glass Votive Candle Holder Cup
- Light Green Chenille
- Dark Green Chenille with bumps
- Assorted small rocks - 1/2 inch
- Wire cutters
- Strong Stapler or Staple Gun
- Acrylic Paints (see colors below)
- Gloss Varnish
- Small Paint brushes
- Medium or 19 Gauge Wire
- Pencil
- Glue Gun
- Tacky glue
|
- Navy Blue: Four 1 and 1/2" primitive heart shapes, two 1" primitive hearts, and two mini clothes pins.
- White: One Square and Two 1 and 1/2" primitive heart shapes.
- Red: Paint red strips over the white pieces in two opposite directions to create a check pattern, also paint a red triangle in the center of the oval for the nose.
- Yellow: Three Sunflower shapes.
- Dark Brown: In the sunflower shapes paint a brown circle to form the center of the sunflower.
- Orange: All ball knobs.
- Black: Scarecrow eyes and mouth.
- Coat all pieces with gloss varnish.
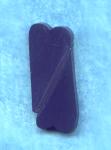
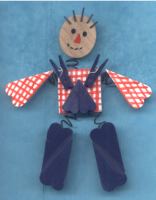
- Turn two of the blue 1 and 1/2" primitive hearts so that both points are facing each other and then bring them together along their sides. Glue them in this position with tacky glue. Let dry. This will form the pant leg of the scarecrow.
- Repeat with the other two blue 1 and 1/2" primitive hearts.
- Wind a piece of the medium wire around a pencil once or twice, slide off pencil.
- Bend the ends on each side of the curl so they point straight north and south.
- Trim the ends so they are 1/2 inch beyond curl. (see photo)
 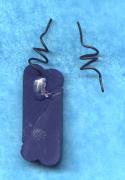  
- Repeat these steps so that you have five of these wire curls.
- Turn over the pant leg piece that you just made and lay one straight end of a wire curl on the end of it. Then cover the wire end in hot glue with your glue gun. Hold in place until set.
- Repeat this step with the other pant piece and the two arm pieces. (see photos)
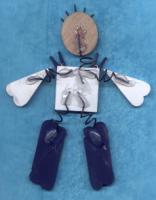
- Now turn over the square piece (shirt), take one of the pant pieces and lay the other end of the wire curl in place on the shrit and cover the wire with hot glue. Hold in place until set. Repeat for the other pant piece.
- Follow the same instructions to attach the arms on the back of the shirt.
- Lay the scarecrow body and head right sides down and in a finished position.
- Lay the last wire curl so the straight ends are on the back of the head and the back of the shirt.
- Cover each end of the wire with hot glue one side at a time. Hold in place until set.
- After the glue is cool and dry, cut five, 1/2" pieces of wire and glue them on the top of the head of the scarecrow with tacky glue for hair. Let dry.
- Using tacky glue, glue the two blue, 1" primitive hearts onto the square shirt front with both points pointing up and sides against each other. These make the upper part of the overalls. (see photo)
- Using tacky glue or hot glue, glue the two blue mini clothes pins at the upper corners of the shirt square to be the overall straps.
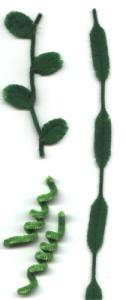
- To make a sunflower stem, take one piece of green chenille with bump stems and bend a bump in half. Twist the chenille together at the ends of the bump a couple of times to hold in place. This bump is now a leaf.
- Repeat this process on the rest of the bumps in alternate directions.
- To make the pumpkin stem/vines, take one piece of lt. green chenille and cut it in half.
- Take one half and wind the entire length of it around a pencil. Repeat with the other half piece of chenille.
- Stick one end of each curled piece of chenille into the hole of the wood ball knob (pumpkin). Do this with desired pumpkins.
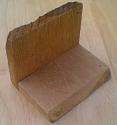
- Arrange the back and base pieces of wood as shown in the photo to form an L shape. (The back piece should be standing on the table and not on the base when finished.)
- Nail them together.
- Using your stapler, staple the chicken wire to the back piece of wood.
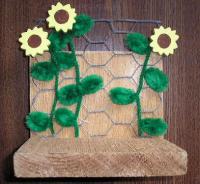
- Next, glue each of the sunflowers against the chicken wire on both left and right sides leaving a space in the middle for the scarecrow.
- Glue the finished scarecrow against the chicken wire and between the sunflowers.
- Set your glass votive candle holder in the center of the wood base in front of the scarecrow to see where your rocks and pumpkins should be placed.
- Place your rocks randomly around the base of the votive candle holder, then glue each one in place with your hot glue gun so that the votive holder will not slip out of place. (Votive holder will be able to be removed by lifting up.)
- Glue the pumpkins randomly on either side of the votive candle holder making sure that the chenille vines do not go over the votive candle holder.
|
|
|


