~ How To Projects ~
Pressed Flower Clock

Click below for more
Craft Projects and Patterns
|
~ Projects By Theme ~
- Animals
- Seasonal
- Holidays
|
|
Pressed Flower Clock
~
May 2001
|
- Two 5" x 8" pieces of Acrylic Imitation Glass (Have one 8" x 10" piece cut in half)
- Quartz Battery Operated Clock Motor for 1/4" clock face.
- Clock hands (Minute hand should be no longer than 2 inches.)
- 3/8" Clock Numerals
- Fine sandpaper
- Clear, Non-water based glue.
- Small Pressed Flowers and leaves. (Violas and Pansies work best.)
- 4" Doily or Colored Tissue
- 3/4 yard of 1/4" Ribbon
- Clock Face Pattern
- Washable Marker and Ruler
- You will need the use of a 5/16" drill bit.
|
- Most large hardware stores carry an imitation glass made of acrylic that comes in pieces of various sizes. If you ask them to, they will cut it for you. 8" x 10" is a standard size available. Ask them to cut it in half so that you will have two 5" x 8" pieces. (HINT* If the glass comes with its protective paper covering, leave it on as long as possible to avoid scratching the glass.)
- Next, carefully measure the glass to find the center of each piece and make a mark.
- Drill a hole through each piece directly through the center of your mark.
- Carefully sand the cut edges to remove any sharp edges. (Make sure that you only sand along the straight edge. If you let the sandpaper touch the front or back of the piece of glass, it will scratch and could ruin the glass for the clock.)
- Peel the protective covering off of the glass pieces.
- Clean the glass with window cleaner and paper towels.
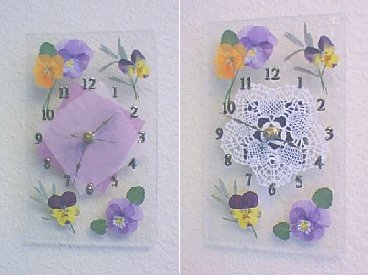
- On one piece of glass, try arranging the flowers around the edges without using glue to come up with a design that you like.
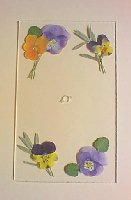
- Also, place the doily down, centered over the hole, to check your flower placement. After you have decided on a good place for the flowers you are ready to glue them on.
- Working on one corner at a time, start with the flower or leaf that is going to be under the others.
- Use a toothpick to apply a very tiny amount of glue to the back of the flower or leaf.
- Return it to its position and press lightly.
- Continue to glue the flowers and leaves working from the flower or leaf that will be below the others, and gluing one at a time, overlapping them slightly, with the ones that are on the top layer.
- Using a toothpick again, apply TINY drops of glue randomly on the back of the doily. (It doesn't take very much.)
- (If you are going to use a tissue paper center, DO NOT use glue on the paper.)
- Carefully place the doily centered over the hole. Press into place very lightly.
- Clean the top piece of glass and then lay the two pieces together.
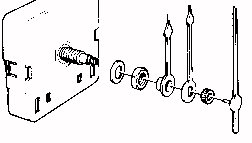
- Take the nuts and washer off of the motor shaft. (Leave the rubber cushion on if there is one.)
- Put the motor shaft up through the center holes of both pieces of glass. (Make sure if your clock motor came with a separate hanger, that the hanger is on first. Or if the hanger is a hole in the back of the motor, make sure the motor is turned correctly for you to hang the clock after assembly.)
- Next, put the washer back on the shaft, then the hex nut. Making sure that the motor is still in the right position. Tighten the nut into place.
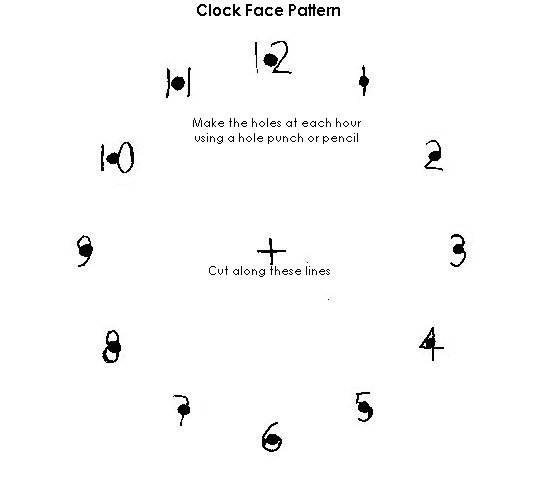
- Now you need to put the numbers onto the clock face. Using our helpful clock face pattern, Place the pattern over the center shaft.
- Using a ruler, make sure that the pattern hole for the 12 o'clock marking is horizontally centered on the clock.
- Hold or secure the pattern in place and make tiny markings at each hour with a washable marker.
- Apply the numbers to their positions. (You may want to add a tiny drop of the clear glue for added durability.)
- Place the hour dial onto the shaft and press lightly into place, pointing at 12 o'clock.
- Put the minute hand onto the shaft, point it at 12 o'clock and lightly screw the minute nut into place.
- Press the second hand onto the tip of the shaft.
- Starting at the bottom of the clock edge, Apply a small amount of the clear non-water based glue to the bottom edge.
- To attach the ribbon to the bottom edge, start at one end, put the end of the ribbon on the glue and hold in place with your finger. Using your other hand, pull the ribbon so that it is taut and carefully lay it onto the glue along the whole length of the bottom edge. Lightly press along the ribbon.
- Again, add glue to the next side edge of the clock, pull the ribbon again so that it is taut and carefully lay it onto the glue along the whole side edge of the clock. Continue all the way around the clock.
- When you reach the bottom edge again, allow a 1" piece of ribbon to turn the corner and overlap the starting place of your ribbon. Trim, and glue in place.
|
|
|


