~ How To Projects ~
Leather Pouch

Click below for more
Craft Projects and Patterns
|
~ Projects By Theme ~
- Animals
- Seasonal
- Holidays
|
|
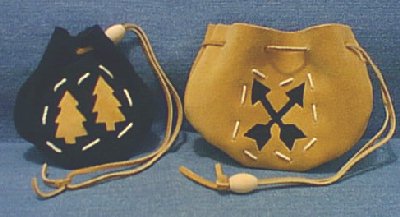
Leather Pouch w/Silhouette Design
~
June 2001
|
- 1 Piece of Soft, Thin Leather (8 1/2" x 11")
- 1 Piece of Contrasting, Soft, Thin Leather (3 1/2" x 3 1/2")
- 1/8" thick Leather Lace
- Elmer's clear Household Cement or other leather glue.
- X-ACTO Knife
- Very Sharp Scissors
- Stapler
- 1 Bead with 1/8" diameter hole
- Marking Pencil
- Cable Cord
- Large Needle for Cable Cord
- Hammer
- 2 Sizes of Large Sharp Nails (One to make holes for the Cable Cord, and one to make holes for the Leather Lace.)
- Scrap Wood Block
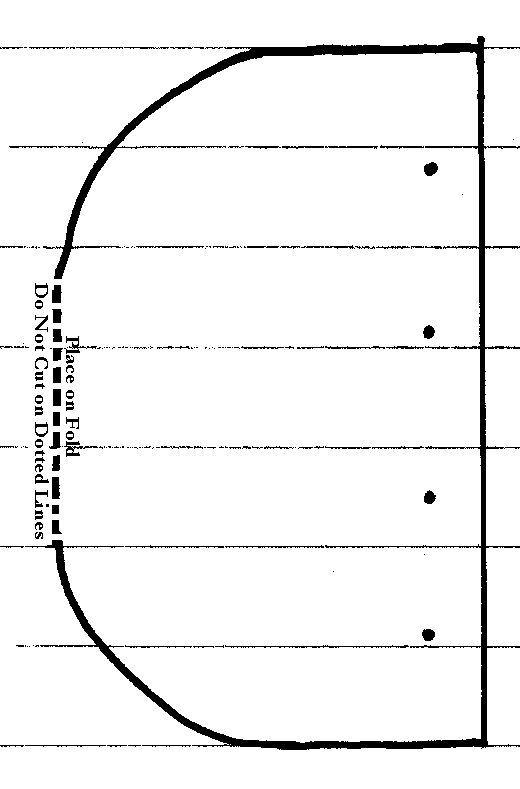
- Leather Pouch Pattern
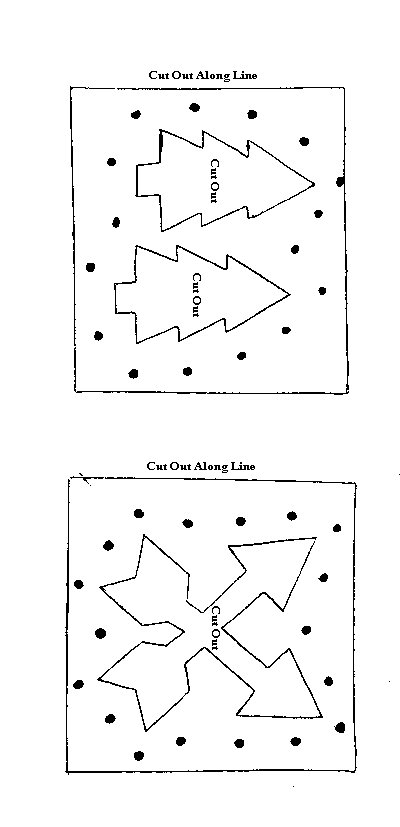
- Silhouette Patterns
|
- Using the Leather Pouch Pattern, trace the pattern onto the leather and then cut it out with the X-ACTO knife or very sharp scissors.
- Decide which side will be the inside of the pouch.
- On the inside of the pouch, center the Silhouette pattern so that it is approx. 1/2" from the bottom and 1 1/2" from the top of the pouch.
- Trace the design onto the leather.

- Place the leather onto your scrap wood block.
- Using the X-ACTO knife, carefully cut out the design.
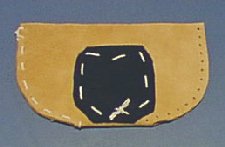
- Cut out a 3 1/2" x 3 1/2" piece of contrasting leather. (It needs to measure at least 1" more, in each width and length, than the design.)
- Again, on the inside of the pouch, Apply glue to the area directly surrounding the design out to about 1/2" from the designs edges. (Because the leather is porous, you will probably need to apply two coats of glue.)
- Lay the contrasting piece of leather centered over the design and press down.
- Allow the glue to dry overnight.
- Using the design pattern as a guide, make markings onto the outside of your pouch for each of the holes around the design.

- Place the pouch on your scrap wood block and drive a large nail through each of the hole markings.
- Thread your needle with cable cord.
- At the bottom of the design, bring the needle up through one of the holes from the inside(wrong side) to the outside(right side)
- Continue around the design going up and down through each of the holes.
- Through the last hole you should be going down, back to the inside(wrong side).
- Tie the two ends together with a knot and trim cord.
- Fold the pouch with right sides together.
- Staple the leather together at the top edge of the pouch. (This will hold both sides in place while you make the holes.)
- Using your hammer and nail again, make holes along each of the side edges approx. 1/4"apart.
- Thread your needle with cable cord.
- Starting at the top corner of the pouch, run your needle through the first hole and tie a secure knot and trim the end off.
- Stitch the whole side together going up and down through the holes.
- Tie off the end with a secure knot and trim the cord.
- Do the same to the other side.
- Take off the staples and turn the pouch, right-side-out.
- Using the pouch pattern, make the marks for the draw string holes, across the top of the pouch. (These holes should be at least 1/2" from the top edge of the pouch.)
- Hammer your largest nail through both the back and the front of the pouch at each of the markings.
- Starting at one side, thread the leather lace through the holes. (Start by going from the outside, to the inside. Then go in and out all the way around to the other side.)
- Leave enough leather lace at both ends to make a strap; Approx. 6" to 8".
- Simultaneously, Feed both ends of the lace through the bead.
- Tie the ends of the leather lace together into a knot.
|
|
|


