- Plastic Yogurt Lid
- Scissors
- Large Needle
- Glue Gun
- Pink thread
- A candle that you can light for a few minutes to use the melted wax.
- Ribbon for Rose
- 7/8 inch wide Pink
- 1/8 inch wide Lt. Green
- Ribbon for Daisy
- 1/4 inch wide White
- 1/8 inch wide Yellow
- Ribbon for Salvia or Lavender
- 1/4 inch wide Blues or Violets
- 1/4 inch wide Green
|
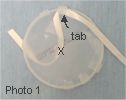
Before you can create the daisy you will need to prepare the yogurt lid for use. Make cuts all the way around the yogurt lid about 1/4 inch apart and about 1/4 inch deep in toward the center. (Each little section between two of the cuts we will call "tabs".) Also make an X cut in the center of the lid.
- Take your 1/4 inch wide, white ribbon. With the top of the yogurt lid facing up, send the end of the ribbon through the X in the center of the lid. Pull about 3 inches of the ribbon through the X to the underside of the lid.
- To create the petals; at 12 o'clock on the yogurt lid, pull one of the sections that are between two cuts toward you. (We will call these sections "tabs") Wrap the ribbon around the "tab". (see Photo 1.)
 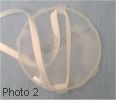  
- Select another tab at 6 o'clock, directly below the first tab you used. Pull it toward you and wrap the ribbon around the tab. (see Photo 2.)
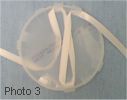
- Next, back at the top, to the right of 12 o'clock, skip the tab that immediately follows 12 o'clock and take the next tab. Pull it toward you and wrap the ribbon around it. (see Photo 3.)
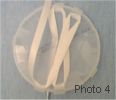
- Now, back at the bottom, to the left of 6 o'clock, skip the tab that immediately follows 6 o'clock and take the next tab. Pull it toward you and wrap the ribbon around it. (see Photo 4.)
- Continue in this manner, going clockwise around the yogurt lid using every other tab to wrap the ribbon around until you reach the point where you started at 12 o'clock. (If it does not come out exactly the right number of tabs, that is ok, just be sure to go all the way around once, even if have to overlap the last petal.)
- Hold the ribbon at the center of the yogurt lid, measure out 3 inches from there and cut the ribbon.
- Thread the ribbon down through the center X in the lid.
(Photo steps shown in blue for easier viewing.)
- Thread the large needle with a piece of the 1/8 inch yellow ribbon that is about 20 inches long.

- With the top of the yogurt lid still facing up, send the needle up through the center X of the yogurt lid and just to the right of a ribbon petal at 12 o'clock. Pull the ribbon through leaving about 3 inches of ribbon on the underside of the lid. (see Photo 5.)
- Position your needle on the other side of all the ribbon in the center (going over it) and just to the left of the 6 o'clock petal.
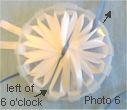
- From that position, send your needle under the ribbon in the center (and along the top of the yogurt lid) and this time bring your needle out just to the right of the petal that comes after 12 o'clock going in a clockwise direction. Pull until tight. (see Photo 6.)
- Now, position your needle on the other side of all the ribbon in the center again and just to the left of the petal that comes after the 6 o'clock petal going in a clockwise direction.
- Continue in this manner, going clockwise around the petals, over and under the center ribbon until you reach the point where you started.
- Once you reach that point, continue on to about 3 o'clock so that you overlap the place where you started a little bit.
- Send the needle and ribbon down through the center X on the yogurt lid and pull tight.
- Leave about 3 inches of ribbon at the underside of the yogurt lid and cut the ribbon.
To finish the daisy, hold all ribbon ends below the yogurt lid. Pull down each tab and slide the ribbon off of the tab. When they are all off, pull the ribbon ends out of the center X hole. Tie all ribbon ends together in a knot two times and trim the extra off.
Before you begin creating the rose, light a candle and let it burn until there is a little pool of liquid wax around the wick. This will be used to help keep the cut ribbon ends from fraying while you work.
- Cut a 6 inch piece of 7/8 inch wide, pink ribbon.
- Blow out your candle and run the cut edges of the ribbon through the melted wax just enough to coat the raw edge. (This should help keep the ribbon from fraying while you work with it.)
- Thread your needle with pink thread and tie a knot at the end.
- Put a running stitch along one 6 inch edge of the ribbon and leave at least 3 inches of the thread at the end of the ribbon without tying a knot.
- Do the same thing to the other 6 inch edge.
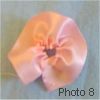
- Re-thread one of the pink threads onto the needle and pull the thread through the ribbon to create tight gathers in the pink ribbon. Make a knot to hold the tight gathers in place. This is the base of the rosebud. (see Photo 8.)
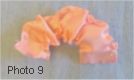
- Now re-thread the other pink thread onto the needle and pull the thread through the ribbon but this time, do not pull it as tightly. Make a knot to hold the gathers in place. This is the top of the rose. (see Photo 9.)
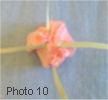
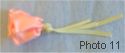
- Roll the ribbon in a spiral tucking the corner edges of the ribbon toward the rose center so they do not stick out.
- Using your needle and some pink thread, make a few stitches in the base of the rose and along the end of the ribbon that is on the outside to hold the rose in its position.
- Cut three 10 inch pieces of ribbon in shades of blues or violets.
- Tie the three pieces together on one end to be the top of the flower.
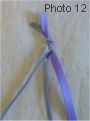
- Lay them out so that the knot is at the top and the three pieces of ribbon hand down from there as a left ribbon, center ribbon, and right ribbon. (Kind of like you are going to braid but instead you will tie some loose knots.)
- Tie the left ribbon and the center ribbon together loosely up against the knot.
- Next, tie the center ribbon and the right ribbon together loosely up against the knot.
- Then go back and tie the left ribbon and the center ribbon again.
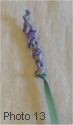
- Continue tying the ribbons together loosely in this manner until the tied ribbon measures approximately 1 or 1 and 1/2 inch in length.
- Complete the flower by tying all three ribbons in a knot together at the base.
- Tie a piece of green ribbon to one of the pieces of blue ribbon.
- Trim all ribbon ends including the ends at the top of the flower.
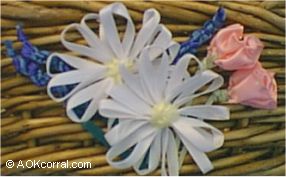
Arrange your flowers on a supportive type surface. We used a basket. Use a hot glue gun to attach the flowers to the basket or other surface. You could also sew them on to fabric surfaces.
|
|