~ How To Projects ~
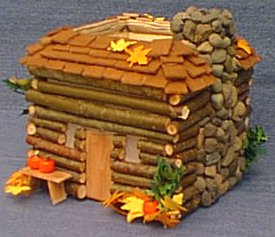
Log Cabin Votive Candle Centerpiece

Click below for more
Craft Projects and Patterns
|
~ Projects By Theme ~
- Animals
- Seasonal
- Holidays
|
|
Log Cabin Votive Candle Centerpiece
~
November 2001
|
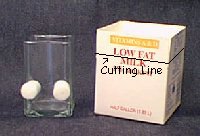
- One half gallon, Milk Carton
- One, square glass votive candle holder that is 4" tall and approximately 2 1/2" wide.
- Perma-stone or Plaster of Paris
- Disposable mixing container, mixing utensil, and newspaper.
- Misc. Wood pieces:
- a 1" cube (chimney)
- a 1/4" thick square measuring 2" x 2" (chimney)
- a 1/4" thick rectangle measuring 1 3/8" x 1" (chimney)
- 3/8" doweling (roofing)
- 1/2" wide and 1 cm thin crafting wood. (front door & shingles)
- 1" wide and 1/8" thin crafting wood. (roofing)
- One standard dinner candle
- Lots of twigs/sticks that measure approx. 1/4" in diameter. (Try to find twigs that have straight segments measuring 4 1/4" long.)
- Any hand held woody stem pruning tool.
- Very small pebble rocks or gray aquarium rocks.
- Wax paper
- Clear Contact Glue
- Glue gun with glue
- Ruler
- Pencil
- Scissors
- Miscellaneous miniatures, such as mini trees or shrubs, mini pumpkins and/or wagon wheel etc..
|
- Make a line around the milk carton 3 1/2" up from the bottom.
- Cut along the line around the milk carton.
- Set aside.
- On a cutting board, using a large chopping knife, cut two 1/2" wide pieces off the bottom of the dinner candle. (This may take a few tries if the candle is brittle.)
- Using the left over candle, make two marks onto a side of the square votive holder; 1 1/2" from the bottom, and as close to the corner of the votive holder as possible. (These will be the window positions.)
- Attach each piece of dinner candle to the votive holder with clear contact glue on the markings.
- Let the glue set.
- Apply some clear contact glue to the other side of the dinner candle pieces.
- Carefully lower the votive holder into the milk carton. When it has rested on the bottom of the milk carton, push the votive holder side, with the dinner candle pieces, against the milk carton to attach.
- Let the glue set.
- Prepare a mixture of perma-stone or plaster of paris. (Be sure to use disposable mixing container and utensils for this step.)
- Very carefully pour the mixture into the milk carton around the votive holder. (You may want to cover the top of the votive holder so that none of the plaster drops into it.)
- Gently tap the milk carton against the table to remove any air pockets.
- Let the perma-stone dry for approx. one hour.
- Tear the milk carton off of your newly casted votive holder.
- With a small knife or pocket knife, carve out the two dinner candle pieces all the way to the glass votive holder.
- Wipe and scratch off any plaster that stuck to the portion of the glass votive holder that remains exposed.
- Let the newly cast votive holder set overnight.
- Cut some pieces of wax paper to fit over the window openings and glue them into place.
- On the side of the cabin, Glue (use glue gun from here, on) the one inch cube onto the top ledge of the perma-stone base. (Do not glue the cube to the glass votive holder, it should be about 1/8" from the glass.)
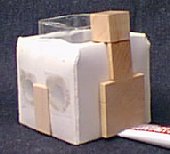
- Glue the other pieces of wood for the chimney, against the perma-stone, under the 1" cube to form the chimney base.
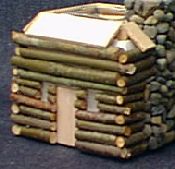
- Cut a front door from pieces of the 1/2" x 1 cm thin crafting wood. It should measure approx. 1 3/4" tall and 3/4" wide.
- Glue the front door into place between the windows.
- Let all the glue set.
- Using your glue gun and little pebble rocks/aquarium rocks, completely cover the surfaces of chimney wood pieces.
- Prepare your "logs" as follows:
- When measuring the sticks to make the logs, allow an extra 1/4" to each log that will touch two corners. Allow an extra 1/4" to every other log that will touch only one corner. (For example, you will need many 4 1/4" straight sticks for the back and one side of the cabin. You will need to custom measure and cut pieces for the front of the cabin and the chimney side.)
- Starting at the bottom of the back wall, lay the first log so that one edge is flush with a corner of the cabin, the other end of the log should extend 1/4" beyond the other corner. Work your way around the whole cabin this way until you come back to your starting point.
- For the next row you will need to lay the first log so that the edge is extending 1/4" beyond the starting corner of the cabin, and the other end is flush with the other corner. Continue to work you way around the whole cabin again. This will create the effect of logs criss-crossing together.
- Continue your way around the rest of the cabin, leaving openings for the windows and working around the chimney.
- Cut three pieces of doweling, each measuring approx. 3" long. Lay them along the top of the perma-stone ledge on all sides except the chimney side.
- Glue the doweling down.
- Measure and cut two small pieces of doweling to fit between the chimney and the other doweling pieces.
- Glue those pieces down onto the perma-stone ledge on either side of the chimney block.
- Cut three pieces of the 1" wide, 1/8" thick crafting wood to the same dimensions as the doweling.
- Glue them at a slant over the doweling to form the roof. (*Important! The wood should not be touching the glass votive holder or hanging over it at all. There should be at least an 1/8" distance between the glass votive holder and the roof wood.)
- Cut the 1/2" wide, 1 cm thin crafting wood into lots of 1/2" pieces.
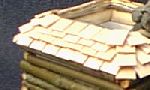
- Starting at the bottom edge of the roof, lay the shingles around the roof. (Leave a tiny crack of space between each shingle.)
- For the next row of shingles, lay the first shingle so that it is centered over one of the tiny cracks from the previous row. Continue around the roof until you reach the top of the roof.
- Paint the shingles
- Glue on a few miniature items such as; Pumpkins (use small orange beads), Mini Trees or Bushes, Mini wagon wheel, or anything. Use your imagination.
|
|
|


