~ How To Projects ~
Handmade Shadow Box

Click below for more
Craft Projects and Patterns
|
~ Projects By Theme ~
- Animals
- Seasonal
- Holidays
|
|
Handmade Shadow Box
~
January 2006
|
- One 5 x 7 Wood Frame
- Corrugated Cardboard (most packing boxes are made of this type of cardboard, it has two layers)
- Bias Tape (found at fabric store)
- Tacky Glue
- Hot Glue Gun
- Ruler
- Pencil
- Scissors
- Exacto Knife
- Staple Gun
- Masking Tape
- Acrylic Paint; Lt. Blue & Forest Green
- Paint Brush
- Wilderness Scene postcard or photograph
- Miniature trees & moss (found at most hobby shops with train supplies)
- Miniature plastic animals
- Small wood sticks from trees or bushes.
|
- Using your ruler and pencil, follow the pattern guide measurements shown here to draw the pattern onto the back side of your cardboard.
- Cut out the box on all the solid lines.
- Using your exacto knife, score all the dotted lines. (To score means to slide the sharp knife along the cardboard just hard enough to make a shallow cut but not cutting through all the thicknesses.)
- Bend the cardboard along all the dotted lines away from the back side that has been scored and toward the front side. (The scored lines will make the cardboard easy to bend.)
- One corner at a time, apply tacky glue to the place indicated on the pattern and then fold the corner of cardboard over the glue and hold.
- Repeat this step for each of the corners. You now have a shallow box.
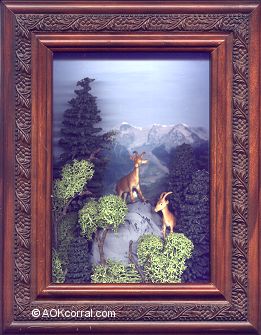
- Paint the inside of the box with your desired background color. For our wilderness scene we painted the background a light sky blue on the top half and a forest green on the bottom half.
- Decide how you want to arrange all your miniatures for a picture scene or still life scene. Glue each piece into the box using a hot glue gun.
- Directions for our wilderness scene;
- Find a nice picture or postcard with a wilderness or mountain scene on it. Cut the sky out of the picture. Using tacky glue, glue the picture inside your shadow box, centered between the painted blue sky and the painted green lower background.
- Create a large mountain rock using masking tape. Crumble up several pieces of tape together until they reach your desired size. Cover the wad of tape with some smooth pieces of masking tape being sure to allow them to form to the bumpy shape of the wad. Paint the rock with a dark gray color, then paint it again with a slightly lighter gray letting some of the dark gray continue to show through.
- Arrange miniature evergreen trees and the rock into a scene and glue into place with a glue gun. Add miniature animals on the rock. Place the green moss into the scene in spots where you need to hide the base of the trees or other things that are not to be seen. This moss will look like bushes or small deciduous trees.
- Cut 2 pieces of bias tape measuring 11" in length.
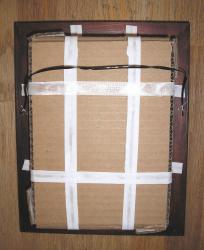
- Using tacky glue, glue the pieces of bias tape horizontally across the back of the box and along the sides as shown in the photo.
- Cut 2 pieces of bias tape measuring 13" in length.
- Next, glue those pieces of bias tape vertically across the back of the box and along the sides as shown in the photo.
- Place the shadow box against the back of the frame in position with each of the bias tape ends extended out onto the wood frame.
- Using your staple gun, staple each piece of bias tape to the wood frame about 1/8" away from the box.
- Trim excess bias tape 1/4" from staples.
- Cut a piece of wire that measures 12".
- On the back of the frame, measure down about 3" from the top of the frame on the left side. Lay one end of the wire in the center at that spot and staple 1/2" from the end of the wire. Bend the end of the wire at the staple and then around itself to secure.
- Follow this step on the other side of the frame with the other end of the wire.
|
|
|


