~ How To Projects ~
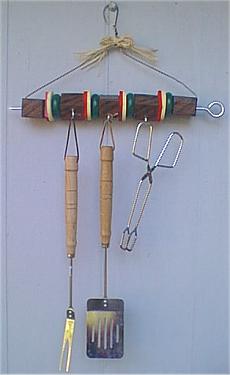
Shish Kabob Barbecue Utensil Rack

Click below for more
Craft Projects and Patterns
|
~ Projects By Theme ~
- Animals
- Seasonal
- Holidays
|
|
Shish Kabob Barbecue Utensil Rack
~
August 2003
|
- Wooden Pieces (all pieces except the five square blocks can be substituted with different sizes or shapes of wood to create desired vegetables.)
- Five; 1 1/2" to 2" Square Blocks (meat)
- Four; 1/2" thick and 2" diameter Wooden Wheels (zucchini)
- Four; 1/4" thick and 2 1/2" or 3" flat wooden Circles (onions)
- Four; 1/4" thick and approx. 1 1/2" x 2 1/2" flat wooden Rectangles (red bell pepper)
- Acrylic Paints & Paintbrush
- Clear Indoor/Outdoor Varnish
- Wood Dowel 5/16" diameter.
- One; Metal Hanger
- One; Screw Eye 5/16" diameter with the screw portion between 7/8" and 1" long.
- One; Screw 5/16" diameter and long enough to extend 1" beyond the length of your wood square. (between 2 1/2" and 3" long)
- Three to Five; Small screw-in hooks or use Small Screw Eyes and bend open into hooks. (approx. 1/8" diameter with 1/2" long screw)
- Drill with 7/16" Drill bit
- Wire Pliers
- Hand Clamp
- Scrap of Wood for drilling over.
|
- Prepare your drilling area by laying a scrap piece of wood down that the drill will be able to hit.
- Use the hand clamp to hold each square piece of wood or to clamp the thin pieces of wood onto your scrap of wood.
- Drill straight holes through the center of all the thin circular and rectangular pieces.
- For the wood square blocks; drill holes at a slight angle through the center. (Be sure that for two of the five squares you start your hole off center just enough to allow the large screw and screw eye pieces to go into the center of the two end square blocks.)
- Paint your thin pieces according to the type of vegetables you want them to be.
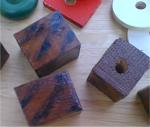
- Paint the wood squares light brown for chicken or medium brown for beef.
- To add the look of grilled meat, use black or charcoal gray paint, apply a little to your paintbrush and then stroke the paint on some paper to remove most of the paint. When you brush contains only a scarce amount of paint, stroke some stripes at an angle along the block to look like grill marks. (Continue this method on all sides of each of the square blocks and any of the other pieces if you want.) (see picture)
- Varnish all the food pieces and let dry.
- Take the two wood squares that you prepared to be the kabob ends. (these are the two blocks in which the holes were made off center to allow a place for the large screw and screw eye to be inserted into the wood.)
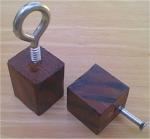
- In one of the square blocks of wood, screw the large screw into the block so that the screw's end will come out on the other side of the block as much in the center as possible and as straight as possible. Screw completely through the wood so that the pointy end of the screw is sticking out of the wood square.
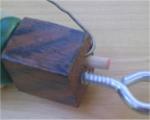
- In the other square block of wood, screw the large screw eye into the block in the center about 1/2" deep. (see picture)
- To assemble the kabob, open the metal hanger by unwinding the ends just below the hanger hook.
- To prepare the hanger to add the food pieces use your pliers to straighten the sharp bends at the top and base of the hanger's short end. (keep the other corner bend intact)
- Start assembly by sliding the square wood block that has the screw point sticking out of it onto the metal hanger.
- Continue adding your vegetable and meat pieces alternately as you wish.
- Finish by sliding the square wood block that has the screw eye sticking out of it, onto the metal hanger.
- Push all the pieces tightly toward the corner bend of the metal hanger that is still intact and use your pliers to make a new sharp bend at the opposite end to hold all pieces tightly in place together. (see picture)
- Bend the metal hanger back into the shape of a hanger (there may be extra wire length left over after reshaping the hanger and twisting the short end of wire back onto the hook end of the hanger.)
- Trim off any excess wire on the end.
- Cut a piece of the wood doweling that is the same length as the kabob.
- Carefully insert the wood dowel through the holes in the wood food pieces and use additional wood dowel to help push the dowel in until the end reaches the other side. (this is to cause the kabob pieces to tightly hold their position.)
- Adjust or rotate the wood food pieces if necessary.
- Screw in the small hooks or screw eyes into the square block pieces. (If using screw eyes, after they have been screwed in, use your pliers to open the end of the screw eye out to form a hook.)
- Use your pliers to additionally bend the hook of the hanger to make it more of a secure loop.
|
|
|


