~ How To Projects ~
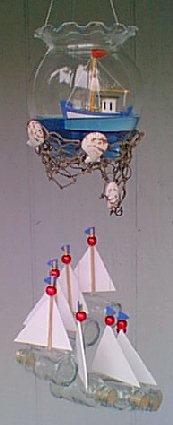
Sailboat Windchime

Click below for more
Craft Projects and Patterns
|
~ Projects By Theme ~
- Animals
- Seasonal
- Holidays
|
|
Sailboat Windchime
~
July 2001
|
- 8 Small Glass Bottles (we used 3 inch) with cork plugs
- Glass bowl with Neck and Base.
- 8 Wood Beads (12 mm) with 1/8" hole.
- Doweling (1/8" diameter)
- "Foamies" 2 mm foam sheets (Usually found near the felt squares in your local craft supply store.)
- Small finished boat (must fit in glass bowl and float)
- 25 lb, Clear Fishing Line
- Clear, non water based glue/cement
- Scissors
- Tape
- Ruler
- Miniature fishing net
- Small sea shells
|
- Take the cork out of the bottle.
- Cut a piece of fishing line approx. 3 feet long.
- At about 12 inches from one end of the piece of fishing line, lay the fishing line across the opening of the bottle top, then replace the cork, securing the line into the bottle neck.
- Bring the short end of the line (12") along the bottle side to the bottle base.
- Secure the line with a small piece of tape, centered, at the base of the bottle.
- Continue to bring the short end of the line, from the base of the bottle, along the other side.
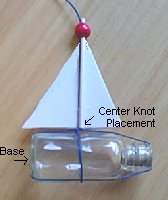
- Tie both ends of the fishing line together once, at the center of the side of the bottle.
- Then, wrap the short end of the line around the circumference of the bottle until it meets the location of the knot again.
- Tie two or three more knots to make a strong centered knot.
- Hang the bottle by the long end of the fishing line to see that the bottle hangs level.
- Trim the short end to the knot.
- Place a dot of glue on the opposite side of the bottle where the two pieces of fishing line meet.
- Remove the tape from the base of the bottle and place a dot of glue over the fishing line a the bottom base edge to secure.
- Let glue dry completely.
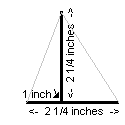
- Make a pattern for the sails using the measurments shown here.
- Cut out the foam sails.
- Cut a 3" piece of doweling for each boat.
- Apply glue to the wood dowel from the bottom end to about 3/4" from the top end of the dowel.
- Stick the dowel to the sail along the the center of the sail.
- After the glue dries, thread one bead onto the fishing line of the bottle boat.
- With the bottle lying on its side, and the fishing line straight up, lay the fishing line along the doweling, against the sail.
- Bring the bead down and insert the doweling along with the fishing line, through the hole in the bead, until the bead is resting against the tip of the sail.
- Place a dot of glue against the doweling and over the fishing line to hold it in place against the sail.
- Let the glue dry.
- Cut out a small triangle of foam or other fabric for the sail boat's flag.
- Apply a dot of glue to the top 1/4" of the doweling and affix the flag to the doweling.
- Let the glue dry again.
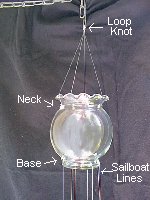
- Tie a piece of fishing line around the neck of the glass bowl.
- Tie a piece of fishing line around the base of the bowl.
- On either side of the glass bowl, tie a piece of fishing line from the top neck fishing line to the bottom base fishing line. (Make all knots secure by tying knots several times.)
- Trim ends to the knot.
- Cut four 18" pieces of fishing line.
- Tie each of the four pieces, evenly spaced, around the top neck fishing line.
- Grasp all four pieces together about 6" from the glass bowl, and hold up to check for balance. (Adjust positioning of lines if necessary.)
- When the bowl hangs nicely, tie one knot where the four pieces come together.
- Braid the ends of the fishing line after the knot.
- Make a hanging loop with the braided portion of the fishing line by; making a loop and then tying another knot over the first knot with the end of the line.
- Tie several more knots on top of each other to secure the knot.
- Apply a dot of glue over the knots that are on the glass bowl's neck.
- Let the glue dry completely.
- Hang the glass bowl from a hook.
- To tie the sailboat bottles to the bottom base fishing line, tie the first bottle at your desired hanging distance from the bowl base.
- Tie each of the other sailboats just a little bit lower than the one before. (Make sure that you check to see that they will hit each other when they are moved, before you tie a knot.)
- Tie each knot twice to secure.
- Evenly space the hanging sailboats around the bottom base fishing line.
- Test the wind chime by swaying to make sure that the boats are correctly positioned.
- After you are satisfied with the positioning, Apply a dot of glue over each one of the knots around the bottom base of fishing line.
- Let the glue dry completely.
- Decorate with miniature fishing net and sea shells.
- Add water to the bowl to float the little boat. (Add food coloring to the water if desired.)
|
|
|


