~ How To Projects ~
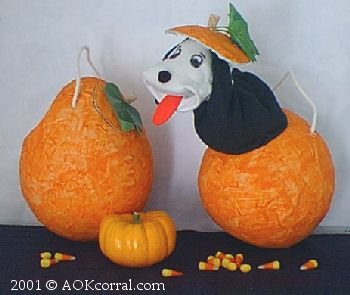
Trick-or-Treat Puppet Pail

Click below for more
Craft Projects and Patterns
|
~ Projects By Theme ~
- Animals
- Seasonal
- Holidays
|
|
Trick-or-Treat Puppet Pail
~
October 2001
|
- For Paper Mache:
- Newspaper or orange colored construction paper
- Flour
- Water
- Masking Tape
- Balloons
- Poster paints (or spray paint)
- Paint brush
- Wood dowel or a cork
- Artificial Leaves
- Sharp knife
- Hot Glue Gun and Glue
- For Sock Puppet:
- Socks (Small to Medium)
- Miscellaneous puppet decorations; eyes, nose, yarn for hair, or felt for ears and tongue, buttons, etc....
- Needle
- Embroidery Floss (Colors to match sock and other connecting fabric.)
- Scissors
- Other soft fabric
- 1 1/2 feet of Rope - 1/2" diameter.
|
- Blow up a balloon to the desired size for your pumpkin pail.
- Paper mache one layer over the balloon as follows:
- Mix together 1 part flour with 3 parts warm water.
- Tear newspaper or colored paper into strips
- Dip the paper strips, one at a time, into the paste mixture.
- Run the paper between two fingers to squeeze off the extra paste.
- Apply the strip to the balloon.
- Continue these steps until the balloon is completely covered.
- Let dry overnight.

- To give extra strength for the pail handle, Apply masking tape from the top of the balloon all the way around the whole circumference of the balloon and back the the top again.
- Paper mache another layer over the balloon, being careful to watch for and mark the direction of the masking tape strip.
- Let dry overnight.
- Before you do any painting, make sure that your pail is completely dry. It should be hard.
- Paint the pail. If you used orange colored construction paper, you may skip this step. (Some poster paints are not thick enough to cover newspaper with one coat. Sometimes spray paint works better.)
- Place the sock on your hand upside down, with the heel at your knuckles.
- Open your hand so that your thumb is below your other fingers as if opening a puppets mouth.
- Using your opposite hand, push the sock area, between your thumb and fingers, toward the palm of your hand.
- In doing this you should have created a mouth-like opening for the puppet.
- Put a pin through each side of the puppets mouth.

- Without changing the position of the mouth, carefully take the sock off of your hand.
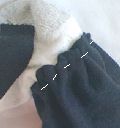
- Stitch a triangle at each side of the puppets mouth to hold the mouth position as shown in the photo. (Use thread that is the same color as the sock, it is shown here in contrast so that you can see it.)
- Decorate the sock puppet to be whatever you want it to be; stitch on ears, or hair; draw on spots or stripes; glue on eyes, nose, tongue, etc.. (Make sure that your placement of the puppets face will fit on a smaller child's hand.)
- You should know what direction the masking tape is running from the top of the pumpkin pail. Do not cut those sides. Consider the masking tape a dividing line for the two sides in which you will make holes.
- Cut a hole in one side of the pumpkin, starting at about 1 1/2" from the top of the pumpkin pail, around to be about 4 1/2" to 5" in diameter.
- On the other side of the pumpkin pail, the piece you cut out must remain completely intact in order to be closed up again when the puppet is pulled inside. So...
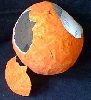
- Using a sharp knife, carefully start the hole 1/2" from the top of the pumpkin pail. The hole should be 4" to 4 1/2" in diameter with one or two jagged locations somewhere around the circle. (This is so that it is easy to identify exactly where the top fits back on.)
- This piece will be the pumpkin top or puppet's hat.
- Glue a 1" wooden dowel or wood cork and an artificial leaf onto the center of the pumpkin top.
- Set this piece aside.
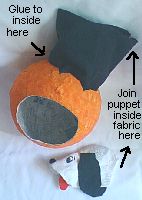
- Cut a piece of fabric that is long enough to be glued inside the circumference of your puppet hole all the way around, plus one or two inches, and as wide as your puppet's head and neck length.
- (*Hint: If you are using a tube sock or one with a tight ankle area, you will need to cut that part off so that your sock puppet will be easy to slip one's hand into.)
- Using your hot glue gun, glue the edge of one long side of the fabric just inside the puppet hole all the way around.
- Then glue the ends of the fabric together forming a tube-like neck.
- Position your puppets neck edge just inside the open end of the tube or neck.
- Using a needle and thread, stitch the sock puppet's neck edge to the open neck end of the fabric with a running stitch (up and down stitch). You will have to gather large portions of the fabric edge with small portions of the sock as you go around since the fabric edge will be much longer than the socks edge.
- Before you tie off the thread, stretch the running stitch out wide by spreading your fingers out inside the puppet's neck at the stitching, then tie off the thread with a knot. (This is important because you need a nice wide opening inside, to put a hand in and out easily, and the running stitch may have tightened the opening as you went around.)
- Put your hand into the puppet and determine the top of the puppets head.
- At the top point of the head put a large dot of hot glue and apply the pumpkin top or puppet's hat making sure that its placed in such a way that when you pull the puppet in, the jagged locations will match up and close the pumpkin top.
- To finish the pumpkin pail you will need to add the handle.
- Using a sharp knife, poke two holes through the sides with the masking tape in them at about 3" from the top of the pumpkin pail.
- Insert each end of the 1 1/2 foot piece of rope into the holes and tie a double knot on the end of the rope inside the pumpkin pail.
|
|
|


