~ How To Projects ~
School Bus Prayer Reminder Frame & Magnet

Click below for more
Craft Projects and Patterns
|
~ Projects By Theme ~
- Animals
- Seasonal
- Holidays
|
|
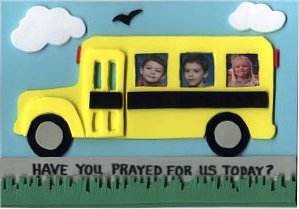
School Bus Prayer Reminder Frame & Magnet
~
September 2003
|
- "Foamies" by Darice - Foam Sheets in the following colors and thickness:
- Light Blue - 3mm thick
- Yellow - 3mm thick
- Black - 2mm thick
- Gray - 2mm thick
- Green - 2mm thick
- White - 2mm thick
- Red - 2mm thick
- Patterns for School Bus Reminder Project:
- Scissors
- Pencil
- Ruler
- Glue
- Permanent Marker or Letter Stickers
- Large Magnet
|
- To begin this project, print out the pattern pieces. Pattern Page 1 & Pattern Page 2
- Follow the directions on the patterns for the number of cut-outs and the colors of foam. (If you wish to extend the length of the bus to fit more pictures, please read the specific instructions below.)
- You will also need to cut a piece of Light Blue Foam that measures 8 1/2 inches by 6 inches (Longer if you will be extending the bus, see specific instructions below.)
- To Extend Bus Size; If you want your school bus to hold more pictures you will need to extend several pieces of the pattern.
The school bus base, the black side strip for the bus, the light blue background and the road and grass strips.
The school bus has dotted lines for an additional segment of the bus you can cut out and use as a guide to extend the bus one additional place at a time.
To do this;
- Cut along the dotted lines of the school bus base pattern to obtain the additional segment pattern guide.
- Secure the back end of the bus on your yellow foam and use your pencil to draw around the pattern.
- Then place the additional segment pattern next to the secured end of the bus pattern and draw in the additional segment. (To make sure that your bus comes out straight, it is a good idea to use a ruler along the top of the bus to keep it straight.)
- For each additional segment you want to add, continue to place the segment pattern next to the last drawn edge moving toward the front of the bus.
- When you are finished adding segments, place the front of the bus pattern next to the last added segment and draw along that pattern.
- You will also need to adjust the black stripe of bus side, blue background piece and the gray road and green grass pieces. To do this add 1 and 1/4 inches for every additional segment that you added to your school bus base.
- Instructions for making Grass; You will be cutting out 2 strips of foam for the grass. One piece is to be placed "as is" at the bottom of your Light Blue Background piece. The other piece needs to be cut with grass details.
To do this; cut straight lines into the foam along one edge of the strip of foam (being careful not to cut completely through the strip). The lines should be close to each other to resemble blades of grass. After cutting the lines, randomly make some of the cut lines shorter than others all the way across the strip.
(see photo) This detailed piece of grass strip will be positioned over the first green strip of foam.
- For the Road Message; (optional) If you are making your frame/magnet to be used as a prayer reminder, you will want to write the reminder on the gray road strip before assembly. Or you can use letter stickers if you want.
- Optional Red Lights; To add the look of small red lights at the front and back of the bus, cut out little rectangles of red foam.
- When assembling your project, apply the glue on the side that you drew the pattern on. This way any pencil lines on your pieces will not be showing on your finished project.
- To assemble the pieces, start at the bottom of the project and work up.
- First glue plain green grass strip, then glue gray road piece directly above the green strip.
- Glue detailed green grass strip on top of plain gras strip.
- Before gluing bus, Center bus and wheels above the road to find good placement.
- Glue wheels in place, then glue bus base in place being careful not to get any glue at the top of the bus where the pictures will be inserted into the bus. (this area is shown in the pattern by a shaded area)
- Glue the other pattern pieces into their places as shown in the picture above.
|
|
|


