~ How To Projects ~
Picture Window Wind Chime

Click below for more
Craft Projects and Patterns
|
~ Projects By Theme ~
- Animals
- Seasonal
- Holidays
|
|
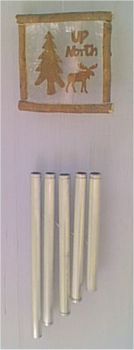
Picture Window Wind Chime
~
May 2003
|
The following pieces of acrylic imitation glass can usually be found in the window section of the hardware store. Ask a service representative in that department to cut the piece of acrylic for you.
- Two 5" x 5" pieces of Acrylic Imitation Glass (Have one 8" x 10" piece cut in half and then each piece trimmed to 5x5.)
- Rustic metal shapes for the picture or use your imagination between the glass.
- 2 straight sticks or wooden dowel pieces 1/2" diameter and 6" long.
- 2 straight sticks or wooden dowel pieces 1/2" in diameter and 4 3/4" long.
- Drill and drill bits 5/32 and 1/16
- Chisel or power tool with small grinder
- Three 1 foot long 2 x 4 boards
- 2 large nails
- Hammer
The following pieces of pipe can be cut using an inexpensive pipe cutting tool and a strong clamp or pair of vise grip pliers to hold the pipe in place while cutting.
- Round aluminum tube 3/4" in diameter cut into lengths of:
- 1 piece 12" long
- 1 piece 11" long
- 1 piece 10" long
- 1 piece 9" long
- 1 piece 8" long
- One 4 inch piece of round aluminum rod 1/4" in diameter.
- Pipe cutting tool
- Hand Clamp
- Clear household cement (waterproof and strong)
- Clear Sealant
- Medium to strong strength fishing line.
- Scissors
- Ruler or measuring tape
|
- Clean both pieces of the acrylic imitation glass.
- Arrange metal shapes or other decoration how you want them on one piece of glass.
- Then pick up each piece one at a time and put trace amounts glue on the back of your decorations and secure them in place on the glass.

- Put a small dot of glue at each corner of the glass and carefully place the other piece of glass on top aligning all edges evenly.
- Allow the glue some time to dry.
- Apply a line of clear sealant all the way around the joined pieces of glass making sure that the opening between the two pieces of glass is being sealed off by the sealant.
- Lay the glass "picture window" on its side on a jar or cup to allow the sealant to dry without touching anything.
- Let dry and set for a day or two before assembly.
- In order to work with the round pieces of wood you will need to create a V shaped trough.
- Take two 2 x 4 boards and nail them together in a V shape. (shown in photo) Use the other 2 x 4 board to balance the V while you are working. You will want to use a hand clamp to hold the round pieces of wood steady in the V trough.
- Make two marks on each of the 6 inch sticks 1/2 inch from the edges. Draw a straight line onto the wood from one marked end to the other.
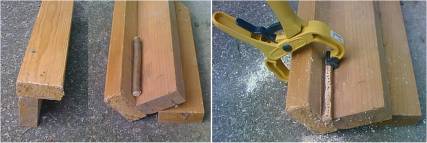
- Clamp one stick into the base of your V shaped trough and use the chisel to make a straight line from one mark to the other.
- Continue to use either the chisel or you can use the drill and grinder tool to cut away an opening in the wood about 1/4 inch deep and wide enough to fit your picture window (approx. 1/4 inch wide)
- Do the same to the other 6 inch stick.
- Make a straight guide line along one side of each of the 4 3/4 inch sticks.
- Clamp one of the 4 3/4 inch sticks into the V trough and chisel or grind out a straight line opening about 1/4 inch deep and about 1/4 inch wide along the complete length of the stick.
- Do the same to the other 4 3/4 inch stick.
- Check each piece for a fit by putting them onto the picture window. If needed, chisel or grind the wood more for a good fit. (You will want them to fit onto the picture
 window edges well enough for the wood and the window to make contact with the glue later.)
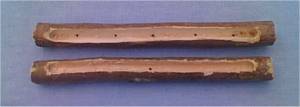
- Make marks inside the top and bottom sticks "frame pieces" for the placement of the holes for the hanger and the chimes. To do this for the top, find the center at 3 inches from the edge, make a mark. For the bottom, make a mark in the center (3 inches from the edge) then make two more marks on either side of that center mark, 1 inch apart (starting from the center mark).
- Use the 1/16 drill bit and drill a hole at each of the marks.
- Lay the picture window on a table with the front side facing you.
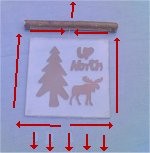
- Cut a piece of the fishing line 31 inches long.
- Find the middle of the piece of fishing line. Then, starting at the bottom edge of the picture window, bring the fishing line all the way around the picture window to meet at the top...allow the fishing line to rest into the sealant in the corners of the picture window to help keep the fishing line from moving out of place.
- Then tie a tight knot at the top and center of the picture window. Tie another knot for more strength.
- Cut 6 more pieces of fishing line, each 24 inches long.
- Tie each piece of fishing line to the line that is running along the bottom of the picture window.
- Tie each knot several times for extra strength.
- Trim the ends to 1/4 inch from the knot.
- Space them evenly apart with two pieces in the center and two spaced on either side. (You will secure these into place later.)
- Get the top frame piece.
- Thread the two pieces of line through the hole in the top frame from the inside to the outside.
- Turn the line back around and thread the two pieces of line back into the hole from the outside to the inside...this will form a loop at the top...do not let this loop go back through the hole. (You may need to put a pencil or something similar through the loop to keep it from slipping through the hole for the next step.)
- Take the two ends of fishing line that you sent back to the inside and tie them to the center knot at the top of the picture window.
- Tie the knot(s) a couple times to make them secure then trim the ends up to 1/2 inch from the knot.
- Put a dot or dots of glue on the knot(s).
- Apply a generous but careful line of glue to the inside of the top frame piece.
- Put the top frame piece onto the top of the picture window while pulling the rest of the hanging loop up through the hole on the outside.
- Hold the piece on with pressure for a couple minutes, then lay it down on the table to dry.
- Get the side frame pieces.
- Apply a generous but careful line of glue to the inside of one of the side frame pieces.
- Put the side frame piece in place along the side of the picture window.
- Repeat steps 17 & 18 with the other side frame piece.
- Hold the side pieces on with pressure for a couple of minutes, then lay it down on the table to dry.
- Get the bottom frame piece.
- Thread each of the first two pieces of fishing line through one of the holes in the frame from the inside to the outside.
- Then thread the next two pieces of fishing line through the center hole in the frame.
- Thread each of the last two pieces of fishing line through the last two holes in the frame.
- Pull the lines through the frame until the frame is almost to the window.
- Apply a generous but careful line of glue to the inside of the bottom frame piece. Apply extra glue to the knots of fishing line.
- Put the bottom frame in place on the bottom of the picture window while pulling the rest of the hanging lines down through the holes until they are completely through.
- Hold the frame piece on with pressure for a couple minutes, then lay it down on the table to dry.
- Cut the 3/4 inch diameter aluminum pipe into the lengths of 12", 11", 10", 9" and 8".
- Use the same V shaped trough and hand clamp that was used for the sticks above to secure one of the aluminum pipes.
- Using the 1/16 drill bit, drill a hole approx. 1/4 inch from one end of the pipe. After the drill goes through the thickness of the pipe, without moving the pipe send the drill bit all the way through the other side of the pipe.
- Do this to each of the pipes. Sand rough edges around the holes if necessary.
- Take the 4 inch piece of 1/4 inch diameter aluminum rod and make a mark in the center (two inches from the edge). Using the pipe cutting tool, cut into the rod just deep enough to accommodate a piece of fishing line.
- To assemble the aluminum pipes, lay the picture window on a table, take the fishing line on the left and thread it through the 12" pipe holes. Pull the fishing line through until the pipe is your desired distance from the picture window.
- Tie the fishing line in a knot above the pipe, tie the knot a few more times.
- Trim the end of the fishing line to within 1/2" from the knot.
- Do the same thing to each of the pipes moving from left to right and from the longest to the shortest pipe being careful to align the tops of each of the pipes. (Leave the second fishing line that is coming from the center for the small aluminum rod.)
- Using the second center piece of fishing line, tie the 4 inch aluminum rod horizontally at about half way down the middle of the 12" pipe onto the groove that you cut into the rod. Let is lay in the behind the vertical rods.
- Apply a small amount of glue to each of the knots holding the pipes and rod into place and allow them to dry completely before hanging your wind chime.
|
|
|


