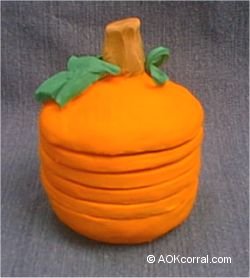
AOK Corral Logo

How To Project              Click here to go home

More Projects available on project library page.
Click
Here


Do you enjoy these projects?

Please help us keep the project library online, growing and free by supporting our site through;

Shopping our bazaar

or

A sponsorship of $10 or more. 

Thank you.


Please wait...Photos on this page take a few moments to load.
After you look at this months project, there are more craft projects available in our project library page.

Please don't forget to Visit our Craft and Gift Bazaar and enter to WIN in our latest giveaway!


Pumpkin Coaster Set
~
October 2004

© Copyright 2004 by AOK Corral Craft and Gift Bazaar.  All rights reserved.
These projects are for your personal use only and may not be reprinted or copied without written permission from AOK Corral.

Materials Needed:

  • 2 pounds Sculpey Oven-Bake Clay
  • Wax Paper
  • Rolling Pin
  • A 1 lb. Sour Cream Container with a 4 1/2 inch diameter top rim.
  • Small Bowl with steep but sloped sides and a top rim diameter of 4 inches or greater.
  • Butter knife
  • Large Coffee Mug
  • Scissors
  • Cookie Sheets
  • Acrylic Paints
  • Paint Brush
  • Gloss Varnish
You will need to use an oven to bake the pieces.

Begin by breaking the sculpey clay into manageable sections and work the clay in your hands until it is soft and pliable.  Make the sour cream container into a template cutter by cutting the top 1 and 3/4 inches off all the way around the container. 
 

Instructions for making the pumpkin bottom:

  1. Get a small bowl with steep but sloped sides. (Hint: The top rim of the small bowl should be the same diameter or a larger diameter than the template cutter edge.)
  2. Push a big chunk of clay into the small bowl and continue to push it all around until it is flattened out. (You will want to use enough clay so that it is approximately 1 inch high when finished.)
  3. Take the template cutter and push it into the clay while it is in the bowl to trim it to the correct size.
  4. Carefully pry the clay out of the bowl with the butter knife.
  5. Next cut extra clay out of the center of the clay "bowl" so that the sides and bottom are not more than 1/2" thick.
  6. Smooth out the inside and outside of the clay "bowl" with your fingers being careful not to change the shape of the "bowl" and keeping the top edge level.
  7. After smoothing, lay the clay "bowl" into the inside of the template cutter to make sure it is still the same diameter. If not, trim any extra clay that extends beyond the cutter's diameter.
Instructions for making pumpkin top;

  1. The pumpkin top will need to be shaped mostly with your hands.
  2. Take a large chunk of clay and form a ball.
  3. Pull a stem up out of the center of the ball.
  4. Work the clay around the stem into a dome shape that is 1/2 inch thick. 
  5. Lay the pumpkin dome onto the template cutter and push it down into the inside of the cutter so that it is given the same diameter as the bottom.
  6. Carefully take the dome out of the cutter and smooth all the edges.
  7. Place the pumpkin top onto the bottom and smooth around the edges to make sure they are the same diameter.
  8. Take them apart again and place them on a cookie sheet.
  9. Bake as directed on the sculpey clay label.
  10. Cool completely.
Instructions for making the coasters;
  1. Roll out some clay out on wax paper to an even 1/4 inch thickness.
  2. Use the template cutter to cut out a circle.
  3. Place the large mug in the center of the circle and push down lightly to make a slight ring just inside the edge of the coaster circle.
  4. Use the template cutter again to trim the coaster to the exact diameter of the cutter.
  5. Carefully smooth the edges without changing the size of the coaster.
  6. Lay the coaster on a separate piece of wax paper and set aside.
  7. Repeat these steps to make at least 4 coasters.
  8. Lay each of the coasters on the pumpkin bottom one after the other to make sure that the diameters are all the same. (If not, you will need to trim the unfit coaster to make it fit better or redo it.)
  9. When all the coaster fit nicely, lay each of them out on a cookie sheet and bake as directed on the sculpey clay label.
Finishing the Pumpkin Coaster Set;
  1. Paint all pieces of the pumpkin coaster set as desired.
  2. (Optional: Add Jack O' Lantern faces to the centers of each of the coasters for fun.)
  3. Let dry completely.
  4. Coat all pieces in gloss exterior/interior varnish to protect it from water.


Done!
Add cinnamon sticks or holiday scented potpourri in the pumpkin bottom.
Cute and useful decoration for the fall holiday season.

© Copyright 2004 by AOK Corral Craft and Gift Bazaar.  All rights reserved.
These projects are for your personal use only and may not be reprinted or copied without written permission from AOK Corral.
 

To View other Projects go to Project Library Page

If you enjoy these free projects, please support our website by shopping our Craft Bazaar
or by a sponsorship of $10 or more.

Thank you.

Home