~ How To Projects ~
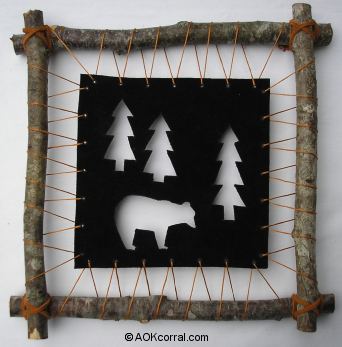
Black Bear Rustic Wall Hanging Project

Click below for more
Craft Projects and Patterns
|
~ Projects By Theme ~
- Animals
- Seasonal
- Holidays
|
|
Black Bear Rustic Wall Hanging Project
~
June 2006
|
- 4 Pieces of Wood Branch with Bark measuring 12 inches long, 1/2" to 3/4" in diameter and as straight as possible. If you do not have branches in your area that you can use, cut 1/2" to 3/4" diameter round wood dowel into four, 12" long pieces.
- Black Leather measuring at least 7" x 7" and 1/8" thick.
- Lt. Rust Color Leather Lace 1/8" thick.
- Bear & Trees Pattern
- Pocket Knife
- Exacto Knife
- Sharp Scissors
- Pencil
- Ruler
- Hammer
- Large Nail
- Flat piece of scrap wood
- Large Needle
- DMC Embroidery Floss Color 3826
|
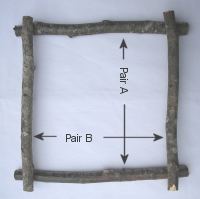
- For this frame you will need the 4 pieces of wood as indicated in the materials list above.
- To further prepare the wood for the frame, take one of the pieces of wood and make marks about 1 inch from each end.
- Using the pocket knife, carefully carve out a u shape at least 1/4 inch deep, 1/2 inch wide, and centered on the mark that you made 1 inch from the end. Do this over the mark on the other end of the piece of wood as well.
- Repeat these steps on one more of the pieces of wood. These two pieces will be called Pair B.
- The other two pieces of wood that you have NOT cut the u shapes into, will be called Pair A.
- On a table, lay out Pair A parallel to each other and spaced about 9 inches apart.
- Lay both of the pieces of wood in Pair B across Pair A parallel to each other in the opposite direction, one across the left and one across the right and about 1 inch from the ends of Pair A. Allow the u shape cuts to rest on the pieces in Pair A. (See Photo)
- For detailed instructions on; How to Join Corners - Click Here
- If not already cut, cut a piece of black leather to measure 7 inches x 7 inches.
- Take your ruler and measure 1/2 inch from the left side and 1/4 inch from the top edge and make a mark.
- Continue to measure and make marks along the top edge of the leather now every 1 inch and still 1/4 inch from the top edge.
- Rotate the leather piece so that another edge is now the top edge and repeat the steps for measuring and marking the hole points. (These marks are also shown on the pattern included in this project.)
- Get your scrap piece of wood and place it on the ground or floor, then lay your black piece of leather on the wood.
- Using your hammer and nail, make a hole at each of the marks around the leather edges by driving the nail through the leather. (Hint: To help the holes become a little bit larger, pull the leather up and down after the nail is secured into the scrap wood. Then pull the nail out to do the next hole.)
- Print out the Bear and Trees Pattern, and cut out the inside of each shape and around the outside edge of the pattern.
- Lay out your scrap piece of wood on the ground or a sturdy table.
- Turn your leather square over so that you are looking at the backside and lay it on the scrap piece of wood.
- Lay the prepared pattern over the backside of the leather.
- Draw each of the shapes onto the the leather by drawing just inside the edges of the trees and bear on the pattern.
- Remove the pattern.
- Carefully cut the leather along the lines with the exacto knife.
- Trim any rough edges with sharp scissors.
- Lay the frame out on a table with the "Pair A" pieces at the top and bottom.
- Place a book that is about 1/2 inch thick on the table in the center of the frame.
- Lay the leather picture right side up and centered inside the frame.
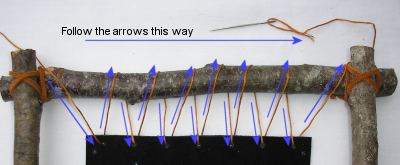
- Cut a piece of embroidery floss that is 54 inches long and thread it onto the needle.
- Starting at the top left, send the needle and floss through the first hole of the leather picture from the front.
- Pull through until there is only 5 inches of floss left from the hole to the floss end. Let the 5 inches of floss end drape over the frame piece and next to the corner joint.
- Next, send the needle and floss over the front of the frame piece and behind pulling only tight enough to remove all the slack in the floss but do not move the picture at all.
- Then, send the needle and floss through the next hole in the picture from the front again tightening just enough to remove the slack again.
- Continue this pattern along the entire top side until you have sent the needle through the last hole and then drape the end of floss over the frame piece and next to the corner joint on the right side.
- Follow steps 3 through 8 above for each side of the picture and frame.
- Now gently tighten any slack that remains in any of the sides.
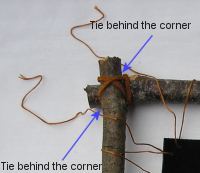
- Starting at the top left corner, take hold of both ends of floss that are draped next to the corner and pull them just enough to remove any slack.
- While holding them, lift the top left corner of the frame up enough to tie the two ends of floss together behind the corner.
- Do the same thing to the opposite, lower right corner.
- Lastly, do each of the other two corners.
|
|
|


