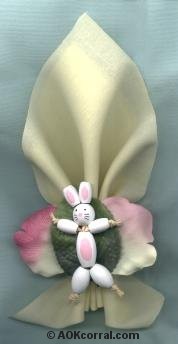
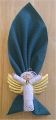
More Projects available on
project library page.
Click
Here
Do you enjoy these projects?
Please help us keep the project
library online, growing and free by supporting our site through;
Shopping our bazaar
or
A sponsorship of $10 or more.
Thank you.
|
Please wait...Photos on this
page take a few moments to load.
After you look at this months project,
there are more craft projects available in our project
library.
Please don't forget to Visit
our Craft and Gift Bazaar and enter to WIN in our latest giveaway!
 |
Spring Bunny Napkin Rings
March 2003
|
© Copyright 2003 by AOK Corral Craft and Gift Bazaar.
All rights reserved.
These projects are for your personal use only and may
not be reprinted or copied without written permission from AOK Corral.
|
Materials Needed:
-
Wood Pieces (all with holes)
-
16 mm Round Beads (head)
-
9/16" x 1" Oval Beads (body)
-
1/2" x 3/4" Oval Beads (legs)
-
9/16" Oval Beads (arms & ears)
-
Raffia Strands
|
-
Acrylic Paint
-
Clear Sealer or Varnish
-
Small Paint Brush
-
Imitation Leaves and Flowers
-
Plain Napkin Rings
-
Scissors
-
Glue Gun
|
(You can paint the bunny body parts
before or after assembly.)
Assemble the Bunny Decoration:
-
Take 3 strands of raffia and tie a
knot at one end. (You may have to tie the knot over again so it is large
enough that it will not slip through the holes in your oval beads.)
-
Make another with 3 more strands of
raffia.

-
Thread one of the oval beads (1/2"
x 3/4" - legs) onto the raffia strands and slide them down to the knot.
-
Repeat this process for the other leg.
-
Next, thread all six strands of raffia
through the larger oval bead (9/16" x 1" - body) and slide the bead down
to meet the other beads (legs).
-
To make the arms, take two of the six
strands of raffia and thread 1 of the smaller oval beads (9/16" - arms)
onto it.
-
Slide the beads to the end of the raffia
strand to meet the large oval bead (9/16" x 1" - body).

-
Tie a knot in the raffia strands at
the end of the "arm" bead. You may need to tie this knot more than once
so that it will be a large enough knot to keep from slipping through the
hole in the small oval beads.
-
Repeat steps 6-8 above for the other
arm.
-
Thread the last two strands of raffia
through the round bead (16mm - head) and slide the bead to meet the large
oval bead (9/16" x 1" - body).
-
Thread one small oval bead (9/16" -
ears) over each strand of raffia to form the ears.
-
Bring each strand of raffia around
the outside and back of each ear and thread them back down through the
hole in the head bead and out the back of the neck. (see picture)

-
Tighten the "ear" beads down onto the
head and pull the raffia strands tight that are now at the back of the
neck.
-
Tie a knot in the raffia strands at
the back of the neck. Again, make sure that you tie the knot enough
times to keep it from slipping into the hole in the bead.
-
Trim the ends of the raffia strands
so that 1/4" to 1/8" is sticking out beyond the knots.
-
Paint your bunny.
-
Clear coat your bunny with varnish.
-
Take a plain napkin ring, (wood is
good) center a green leaf and/or some flower petals to the napkin ring
and glue in place.
-
Place a large dot of glue on the leaf/flower
with the center of the napkin ring behind it.
-
Attach the body bead of the bunny at
the glue dot.
Done!
Fun way to decorate your spring
or Easter place settings.
OR, Use the little bunny decoration
to decorate spring bazaar name tags,
or wherever you need a little
touch of spring.
|
|
© Copyright 2003 by AOK Corral Craft and Gift Bazaar.
All rights reserved.
These projects are for your personal use only and may
not be reprinted or copied without written permission from AOK Corral.
If you like this napkin holder,
see all our Holiday Napkin Holder Series:
  
To View other Projects go to
Project
Library Page
If you enjoy these projects, please
support our website by shopping our Craft Bazaar
Home
|