~ How To Projects ~
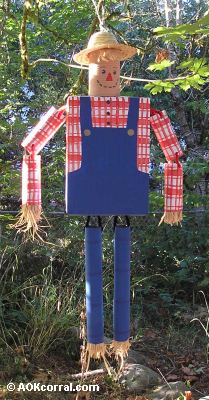
Easy to Make Party Pinata - Made from Recycled Materials

Click below for more
Craft Projects and Patterns
|
~ Projects By Theme ~
- Animals
- Seasonal
- Holidays
|
|
Easy to Make Party Pinata - Made from Recycled Materials
~
September 2006
|
- 1 Cereal Box (7.5 inches wide)
- 4 Toilet Paper Tubes
- 2 Paper Towel Tubes
- 1 Tin Can (standard size with only one end cut off)
- 1 Sturdy Wire Clothes Hanger
- Masking Tape
- Clear Packing Tape
- Strong Twine or String
- 6 Chenille Wire Stems
- Acrylic Paints
- Paint Brushes
- Pliers
- Sharp Scissors
- Hole Punch
- Ruler
- Marker
- Hammer and Large Nail
- (Optional: a hat or other accessories for your character choice.)
|
- Take your cereal box; close the top flaps shut and turn the box over so the bottom is facing up.
- Place a piece of masking tape across the bottom of the box (along the long length) and about 2 inches over each of the side edges of the box.
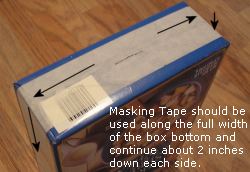
- Using the sharp scissors, carefully cut a 1 inch slit in the center bottom of the box that is parallel with the long sides of the box. The end of the box that was once the bottom of the cereal box will now be the top of our pinata body. (see photo)
- Paint the pinata body in your desired character theme.
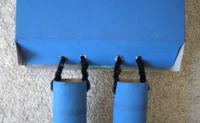
- Paint the toilet paper tubes to be the arms and paint the paper towel tubes to be the legs.
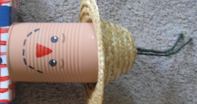
- Take the tin can and make a small hole in the center bottom of the can using the hammer and nail.
- The bottom of the can with the hole will be the top of the head. Paint the can to be your character's head
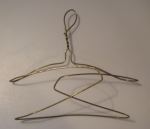
- Take the wire hanger and measure 4 inches from the hanger neck out toward one of the shoulder ends and mark that spot on both the top and bottom wires. Then do the same to the other side.
- Using your pliers, bend the shoulder end of the hanger at the marks in toward the center. Bend the other shoulder end of the hanger at the marks in toward the center as well.
- Bend the hook of the hanger in toward the neck of the hanger to form a closed loop. (see photo)
- Legs:
- Cut two 7 inch pieces of chenille in your desired color for the legs.
- Open the bottom of the body (the flaps of the cereal box top) so that the flap that has the tab is in front of you.
- On each side of the tab, punch a set of two holes that are about 1 inch apart and 1/2 inch from the tab edge of the box. (see photo)
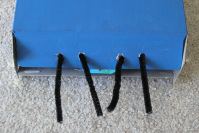
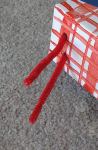
- Thread one piece of chenille from the outside of the flap into one of the holes and then back out through the other hole in that hole set. Continue to pull the end of chenille through until both ends are the same length from where they come out of the flap. Do the same with the other piece of chenille and the other set of holes.
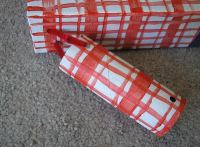
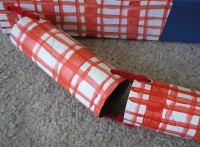
- Take one of the paper towel tubes and punch two holes directly across from each other and about 1/2 inch below the edge of the tube. Do the same to the other paper towel tube.
- To join the leg to the body, send one pair of chenille ends coming from the flap into the paper towel tube and out the holes that you just made in the tube.
- Pull the chenille ends through enough so that you can bend the ends up and wind them around themselves just above the top edge of the paper towel tube. (see photo)
- Attach the other leg in the same way.
- Arms:
- Cut four 7 inch pieces of chenille in your desired color for the arms.
- Using a pencil, punch a set of holes that are about 1 inch apart and about 1/2 inch from the top edge of the box.
- Take one of the toilet paper tubes and punch two holes directly across from each other and about 1/2 inch below one edge of the tube. Punch two more holes in the same toilet paper tube on the other end, directly across from each other, 1/2 inch below the edge and lining up with the holes on the other end. Do this to one more of the toilet paper tubes. These will be the upper arms.
- Take another toilet paper tube and punch two holes directly across from each other and about 1/2 inch below one edge of the tube. Do the same to one more toilet paper tube. These will be the lower arms.
- Thread a piece of chenille through the holes in the top of the box as you did in step 4 for the legs.
- Attach one of the upper arm tubes just as you attached the legs in steps 6 and 7 above.
- Do the same to attach the other upper arm on the other side.
- To attach the lower arm tube, thread a piece of chenille through the holes at the bottom edge of the upper arm tube from the outside through the middle and out the other side again.
- Bend the chenille ends down just outside of the holes.
- Send the chenille ends into the lower arm tube and out the holes. Just as in step 7 for the legs, pull the chenille ends through enough so that you can bend the ends up and wind them around themselves just above the top edge of the lower arm tube.
- Do the same to attach the other lower arm.
- Head & Hanger:
- Open the bottom of the body (flaps of the cereal box top), then slide the hanger into the body box and push the closed loop through the slit in the top of the body as far as possible.
- Cut a piece of twine that measures about 20 inches long and send one end through the closed loop of the hanger. Match that end up with the other end of the twine so that the hanger is resting on the center of the piece of twine when you hold it up.
- Thread the two ends of the twine into the inside of the tin can and out through the hole in the can.
- Pull until the can rests against the body box and then tie the two pieces of twine together in a couple of knots to hold in place. (Keep the extra twine ends left over for tying up the pinata later.)
- Finish:
- Fill the pinata with candy through the open flaps of the box.
- Close the box with the tab just as you would when it was a cereal box.
- Apply clear tape around the corners of the box to hold the flap closed. The amount of tape you will want to use depends on the weight of the candy and the age group of participants. If you are doing a party with very young children and your candy is not too heavy, you may want to tape the corners with regular clear tape. But, if you are doing a party with older children (8-9 yrs. and above) or you have very heavy candy, you will want to use clear wide packaging tape starting from the legs and around the corners an inch or two so that the piñata does not break open too quickly.
We tested this pinata as follows; It was taped shut as explained above for ages 8-9 yrs. and above, Our testers were 8 and 10 year old boys, They used a bat to swing at the pinata, It took approximately 7 good hits on the box to burst the box and allow the candy to fall out.
|
|
|


