~ How To Projects ~
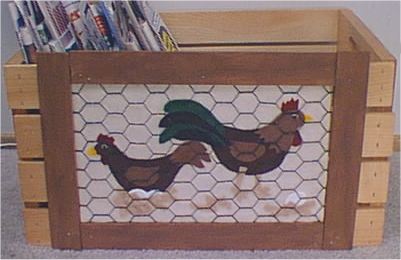
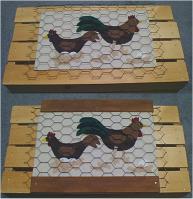
Chicken Coop Window Newspaper Holder

Click below for more
Craft Projects and Patterns
|
~ Projects By Theme ~
- Animals
- Seasonal
- Holidays
|
|
Chicken Coop Window Newspaper Holder
~
September 2002
|
- Wooden Crate or Box (to fit design box must be at least 9 1/2" high and 15" wide, no smaller.)
- Felt (Dk Brown, Cocoa, Cranapple Red, Yellow, Beige, White, Kelly Green, Black, & Ivory.)
- 1 Piece Cardboard 12" wide x 7" high.
- Hot Glue Gun
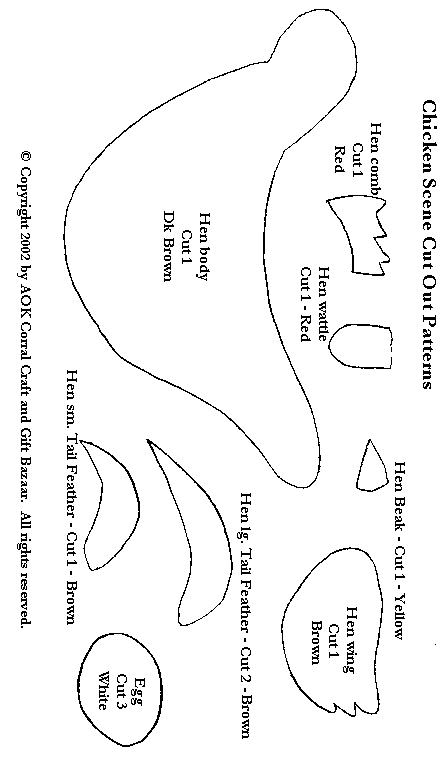
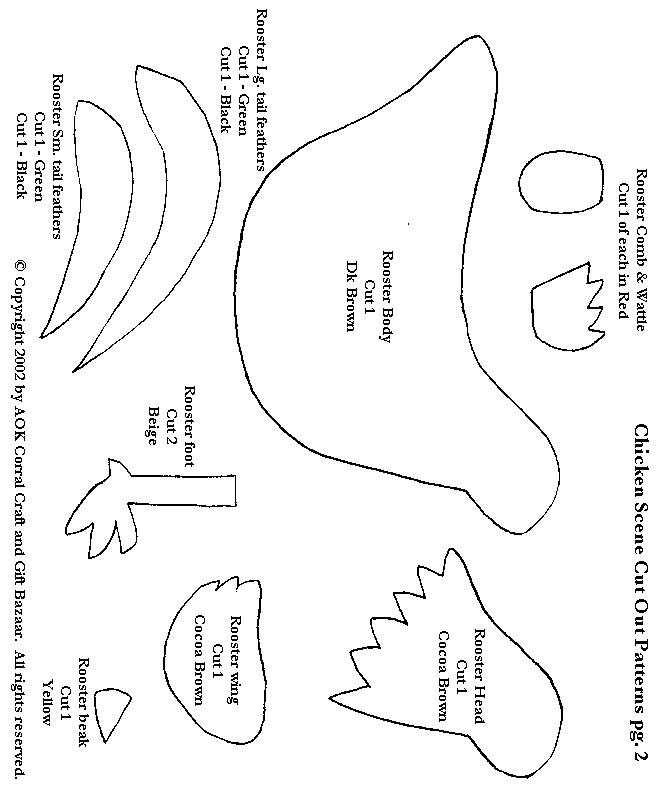
- Cut out patterns for Hen
- Cut out patterns for Rooster
- Scissors
- Chicken wire (small 1" holes)
- Wire cutters
- Black spray paint
- Wood pieces:
- 2 pieces 12" long, 1 1/2" wide, 1/4" thick.
- 2 pieces 10" long, 1 1/2" wide, 1/4" thick.
- Brown Acrylic Paint & Brush
- Hammer and 1/2" nails
|
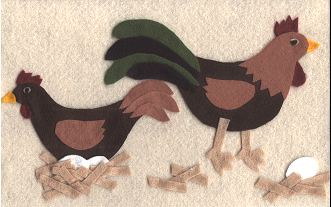
- Cut out a piece of Ivory colored felt that is 12" wide x 7" high and hot glue it to your pre-cut piece of cardboard.
- Cut out all the felt pieces for the chicken according to the color & number directions on the patterns.
- Lay the pieces out on the felt covered cardboard as shown here and hot glue into place.
- Use small scraps of beige to make a nest.
- Use a small circle of white or beige for an eye, then use an even smaller circle of black for the pupil of the eye.
- Cut out a piece of chicken wire that is about 13 1/2" wide and 8 1/2" high.
- Lay it out onto a piece of newspaper outside and spray paint it black. Let Dry
- Paint the pieces of wood brown or your desired color. (These will be the window frame) Let dry.
- After everything has dried, you can begin assembling the window.
- Center the cardboard/design as much as possible onto the front of the box or crate. Make sure that all the pieces of frame will fit around the design and that the bottom piece of the frame will be flush with the bottom edge of the crate. (To fit this design with all the measurements given, the box MUST be at least 9 1/2" tall and as least 15" wide. If you want to put the design on a box that is a little bit less than 9 1/2" tall or 15" wide, you will need to get wood pieces for the frame that are less than 1 1/2" wide and adjust the length of the vertical pieces of frame.)
- Lay the chicken wire on top of the design and center. (There should be approx. 3/4" of chicken wire extending beyond the felt design.)
- Nail down the bottom 12" piece of frame wood first as shown, make sure that it is flush with the bottom of the crate/box and that it is overlapping the chicken wire but not the felt design.
- Next, nail down the top 12" piece of frame wood. Make sure that it is also overlapping the chicken wire but not overlapping the felt design.
- Nail down both vertical 10" pieces of frame wood. Overlapping the chicken wire but not the felt design.
|
|
|


